Yarn Bomb Grandma

Besides maybe The Golden Girls, there aren’t a lot of role models for how to live like a badass as you get older. I firmly believe that we don’t lose our coolness just because we age– it’s just that that’s not a story that gets told very often.

Luckily there are people like crocheter Grace Brett. At 104, she proved that contemporary art need not be just a young person’s game. Grace participated in yarn bombing her UK town with her colorful, crocheted creations. Fanciful and vibrant, they are still most definitely cool.

Via Bored Panda.

Welcome to the Playhouse: Pee Wee Halloween Costume

Henry's Pee Wee Herman costume

Update: As featured on Pee Wee’s blog, May 16, 2016 (!!!)

Henry and I started watching Pee Wee’s Playhouse together a year or so ago. It has honestly been a dream come true for me that he loves the show as much as I did when I was a kid (and, heck, still do). When I was a kid, I never wanted the show to end. I distinctly remember feeling so bummed out when the credits started to roll; thirty minutes was no where near enough time to examine every intricately-designed and decorated corner of the space, or stare intently at the puppets, trying to figure out how they were made. Now that the show has been re-released, the picture quality is astonishing. There are so many new details to take in, now in their fully-realized, HD glory. It’s a feast for the eyes, and the show itself totally holds up as well.

When Henry decided on his Pee Wee costume a few months back, I wasn’t totally sure it would stick. Three year olds aren’t exactly known for keeping their word. I’d check in with him every few weeks just to make sure he was still on board, and since he wasn’t wavering, I decided back in September that it was time to get to work. Since Henry’s blond hair is clearly not very reminiscent of Pee Wee, my mind went to the crazy helmet that he wears at the end of each episode of the show. Just like last year, the costume hinged on some crazy headwear to make it complete.Pee Wee HelmetAfter a lot of research and a lot of searching (this thread was particularly helpful), I eventually collected most of the toys needed for the helmet– giant eyeball, squeaky bulldogs, dinosaurs, cowboys, clown heads. I decided against the flame stickers only because the helmet was already pretty full. Besides the helmet, the rest of the costume was thankfully pretty easy by comparison: The same gray “robot pants” Hen wore last Halloween, a vintage gray jacket on Ebay, white Tom’s knock-off shoes, red bowtie. Pee Wee Herman costume suppliesHenry had a bike helmet that he’d almost outgrown that we decided would be a good base for his headpiece. Though it was already red, I thought that trying to glue toys onto the slick surface probably wouldn’t work very well, so step one was covering the top in papier mache. Pee Wee Herman helmet
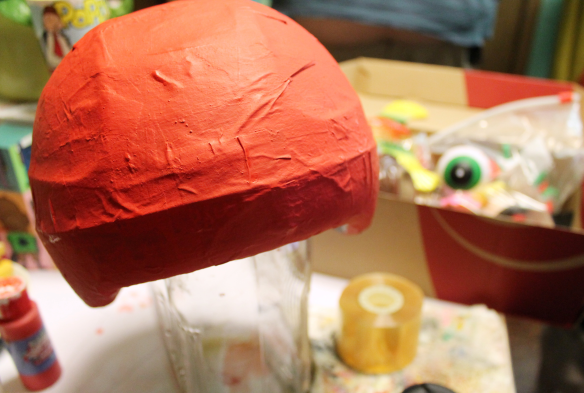
From there, I painted a few coats of red paint and started gluing. Gorilla Glue is great for sticking weird things like this together, but because it takes a while to cure, I had to rig up an elaborate web of tape to keep everything in place. And since that stuff puffs up like crazy, there was a fair amount of chipping away at the extra glue afterwards, too.1_IMG_4117
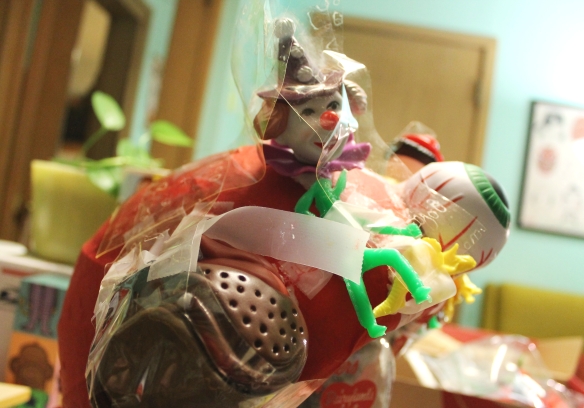
Next was another layer of papier mache to make the eyelid, and then a few coats of paint to touch everything up and hide any extra glue. The final step was then covering the whole dang thing in glitter– a bottle of clear sparkle paint left over from the mural I painted for my niece 15 years ago. Sometimes being a packrat pays off!Henry's Pee Wee Herman costume
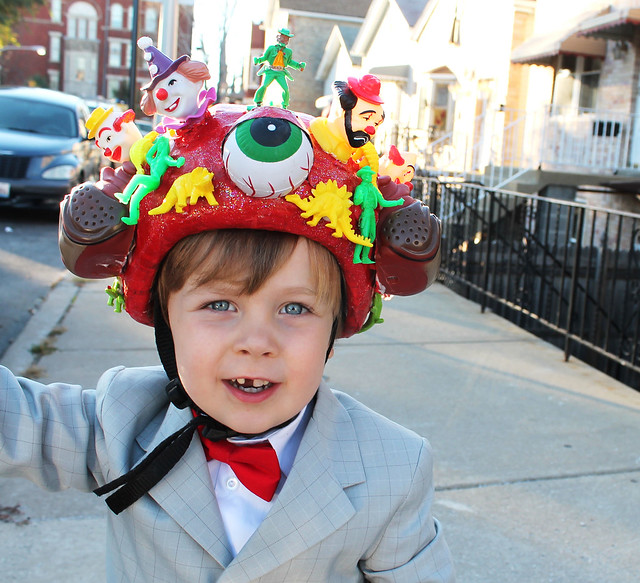
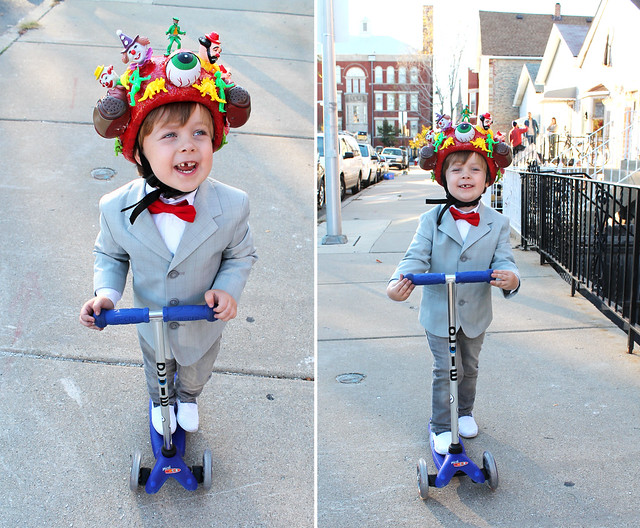
The final product is everything I could’ve hoped for. With the kiddo suited up and on his scooter, it was pretty much unmistakable who he’s supposed to be. (It helps that he’ll sing you the “Connect the Dots” song at the drop of a hat, too.) We tried out his costume over the weekend at a local kiddie Halloween parade and only lost one dinosaur over the course of the evening. I consider that a success!


Update: By popular request, here are the sources where I found the toys used to construct Henry’s/Pee Wee’s helmet, along with tips for how I used them:

Eyeball: The real helmet looks to have a Mad Ball, but they’re now collector’s items and the real ones are hella expensive on Ebay. Instead, I found a foam squeeze toy that was a pretty close approximation, if a little smaller than I’d hoped. The one I bought (on Ebay) was similar to these.
Plastic Dinosaurs: Lots of dinos are easy to find on Ebay as well. I went with monochrome ones to keep it simple (ha!)
Clown Heads: These were on of the trickiest pieces to research, and I was never able to find clown heads that were flat. I think I did come upon something very close to the original at one point, but knew I didn’t have tools that would let me saw through the hard plastic. Instead I went with a 4-pack of cake topper clowns.
Bulldogs: The bulldogs on Pee Wee’s helmet appear to be hard plastic. The closest replica I could find were soft squeaky toys. I cut them down the middle with an x-acto knife and removed the squeaker. Because they’re not rigid, these were tricky to glue down, so I filled them with newspaper that I adhered with tape, then glued that down on the bottom with more glue around the edge.
Cowboys & Indians: Lots of these available on Ebay and Etsy. I went with a bulk lot of about a dozen that were all different because I liked the variety. (I also x-acto-ed off all the guns and threw away the extra racist ones, to keep it 3-year-old appropriate.)
Birds: I searched and searched for ducks like those featured on Pee Wee’s actual helmet. Alas, they were no where on the internet, as far as I could tell. Instead I went with balancing birds, cut in half with the magnet removed. They’re easy to find online, too.


There you have it– a Pee Wee helmet recipe. Or as close as you can get to one, anyway. Good luck!

Blueprint Decorating

We attended an estate sale a few weeks back at the home of a man who turned out to have been an architect or engineer of some sort. His belongings included vintage drawing supplies– pencils, rulers, drafting tape– along with a few bins full of rolled-up old blueprints. I dug through a few of them and we eventually took home a huge black role with detailed diagrams for a mystery machine of some sort.

Our bedroom contains large swathes of wall that I have yet to really figure out. A few years ago I made an engineering print at Kinkos of a vintage photo of a giraffe from the Lincoln Park Zoo (the caption informed me that her name was Cleopatra) that hung above our bed. Best $6 I ever spent, but since the paper is thin, it took a beating through a few summers of fans blowing on it– not to mention mischievous toddler fingers– and fell down for good a few weeks back. I thought that the blueprint (or, more accurately, blackprint) would be a fun addition to the room. It’s tough to find affordable art that will fill such a large space, but the print may just do the trick.

Dogs on the Bed

Unflattering photos of our bedroom taken over by dogs and stuffed animals. This is the bed I’ve got of the drafting print giraffe before it fell off the wall for good.

I have yet to actually hang it up (story of my life), but in the interim I looked a bit on the internet for examples of how other people have incorporated blueprints into their decor. Pinterest was surprisingly light on examples (does that mean I’m a trendsetter?!) but Apartment Therapy had one post about the idea. All in all, I love the bright pop of blue that true blueprints offer, and think they add a fun, abstract element.

A really lovely example of framed blueprints. I wonder if they are the original plans for that house?

This black and white print is a little closer to the one we picked up.

Color to die for, right?

I’ll keep you posted if we do ever get around to hanging ours and take photos without random laundry and dogs in the picture ; ) 


DIY Plant Hangers

I’ll admit, I was a little slow to jump on the macrame hanging planter bandwagon that seems to be all the rage right now. To me, they spoke so loudly of the decor I considered outdated when I was a kid, it was hard to get past that.

That said, as a houseplant lover with mischievous preschooler and a dog who loves barking out the window, I have embraced getting the plants up as much as possible. Not to say that my hanging planter project isn’t still sitting next to me half done, but a girl can dream at least ; ) And to that effect, here are some of the best DIY hanging planters I’m currently dreaming about maybe actually completing.

 (Love the dip-dye in this one, but I do not condone spray painting your plants. That’s just stupid.)blog-3Screen Shot 2015-06-21 at 11.05.54 PM

4 Chair Makeovers

Everybody’s got the thing that they have way too many of in their house, and for me that thing is chairs. I don’t know how it’s happened over the years, but we have seating for twenty in our house. You’d think we threw parties all the time, but really it’s that I have a soft spot for chairs.

Given my inability to pass a chair in the alley without bringing it home (“Yes, I see that it’s broken and water damaged and covered in mud, but look at those bones!”), I tend to also get swept up in the plethora of chair makeover ideas out there in internet land. Got a chair weakness of you own? Here are my five favorite chair makeover project ideas–

1. Wool Blanket ReupholsteryI love that this project blends two totally classic, midcentury looks– a Pendleton blanket and white Burke chair. Sometimes the “reupholster with this gimmicky thing” projects are annoying, but the blanket has such a graphic look to it, it’s almost hard to place what it was originally, and the rounded lines of the chair are a fun contrast to the horizontal stripes.

2. Folding Chair FaceliftThe painted folding chair phenomenon is all over the internet. Though I generally try to avoid projects that rely on spray paint, a friend of mine painted a handful of folding chairs when she got married last summer, sprinkling them throughout the rest of the seating for a super cute effect. It was sweet and simple, and now her guests have a happy place to rest their rears during the holidays.

3. DIY Woven Chair I love the heck out of this project. I have such a weakness for aluminum patio chairs, and even though we have four of our own, it’s hard to pass them up. Now whenever I see a ratty one with a still-good frame, I just know the image of this woven little beauty is going to dance through my head.

4. DIY ReupholsteryTrue, we should all be so lucky to find a chair with a shape this great (and for $10 at the thrift store!), but I like that this post walks you through the steps of adding new batting, a process that even with my love of all things seatin, I find I’m irrationally afraid to try.


Paper Garland DIY

My kind of DIY project is equal parts great design and elementary school throwback. While I’m certainly a fan of good styling and clever ideas, I also rely on a do-it-yourself to get me back in touch with the good old days of glue sticks and construction paper.

Along those lines, I really loved this giant paper bead garland project featured on Oh Happy Day. It’s simple and clever, and I love the idea of a bunch of these at a celebration. Plus, unlike so many projects that you have to buy lots of supplies you’ll likely never use again, this is a great use of materials you’ve probably got lying around anyway.

via Oh Happy Day.

Fresh Paint

In the spirit of trying new things, I’ve been spending a lot of my studio time painting over the past few weeks. I did some experimenting translating my finger puppet characters to paint earlier this year, and made a little set of painted blocks for Henry’s birthday in March. The blocks were actually some that I bought over my maternity leave with the idea of making a mobile for the kiddo’s nursery. Two years later I finally got around to actually doing something (totally different) with them ; )

Screen shot 2014-04-26 at 11.51.44 PMThe wood surface has been much more fun to work on than the paper I’d been trying out earlier, so I ordered some larger blocks online and have been playing around with those lately. I made some alphabet blocks, which I didn’t really like, and some animal puzzle blocks, which I like a lot more.

Desktop10

The biggest challenge so far has been that paint can be worked and re-worked over and over nearly endlessly. With felt, I learned (the hard way, mostly) that the material won’t really take any recutting and only minimal restitching, so you pretty much have one shot to get it right. I’m still figuring out the limitations of the paint, and learning to convince myself that a few imperfections can actually be a good thing.

Screen shot 2014-04-26 at 11.48.41 PMScreen shot 2014-04-26 at 11.48.28 PM

I’m also still researching to try to find the perfect finish for these blocks. It’s been more of a challenge than I expected to get a non-toxic finish that’s more matte than glossy. And in the meantime, the menagerie in the studio keeps growing and growing!

DIY Ombre Bead Necklace

If you know me, you know that I’m much more likely to pin a great craft project than I am to actually try it out. These days, between the kid, work, freelance and, you know, running my own craft biz, the opportunities to bust out a just-for-fun craft project are somewhat few and far between. That said, I totally acknowledge that it’s those opportunities to break out of my comfort zone and try something new that keep the creative juices flowing. So I decided to not only give a new project a try, I’m doing a tutorial, too. Because what good is a project if you can’t share it with the internet, right? ; )

So this project was inspired by the lovely painted bead necklaces I’ve seen around, including one that I purchase from Oceanne at the Indieana Handicraft Exchange over the summer. This Loves That and Totinette make examples that I’ve been drooling over for months, too.

Supplies:

– Unfinished wooden beads

– Cord/string/chain/ribbon to make the necklace

– Acrylic craft paint – white plus one color of your choice

– Small paintbrush

– Skewers or extra paintbrushes

– Water cup

– Palette or other surface to mix paint

– Spray sealer (optional)

Select the beads you’d like to use. I like the look of a little size contrast so I used three 20mm and one 25mm beads for my necklace. Keep in mind that the number of beads you use will determine how many shades of paint you’ll need to mix— more beads equal more subtle gradation in color.

Mix paint for each of your beads using a ratio of white to your selected color (in my case aqua). For the darkest color, I used four drops aqua to on drop white. The next shade was three drops aqua to two drops white, then two drops aqua to three drops white and finally one drop qua to four drops white for the lightest shade. Since the beads are small, you really won’t need to mix more than those five drops unless you plan on painting multiple coats.

The secret to making the beads easy to paint is to thread them onto a skewer or even another paintbrush so you don’t have to hold them with your fingers to paint all sides. Test ahead of time to make sure the skewer you use has a snug fit.

Paint all sides of the bead and let dry. The beads tend to soak the paint up, so dry time will be 1-5 minutes depending on how thickly you applied the paint.

Optional—if you like a less matte look, seal the dry beads with a product like Modge Podge or a glossy finish acrylic spray sealer to add shine.

Thread your dry beads onto a chord and determine the length you like best. Tie in back and voila!, a fun ombre necklace.

Valentines Day Food Passport, Revisited

A few years back, I featured a really clever Valentine’s Day Food Passport idea from The Spotted Fox, one of my fave blogs that sadly no longer exists. (Sniff, sniff.) I recently revisited the post after noticed it getting some traffic recently and realized I’d forgotten just how cute the idea was. Seriously, is there anything worse than rehashing the whole “Where do you wanna go?,” “I don’t know, where do you wanna go?” conversation? Too often in my house those exact questions end with an exasperated 9:30 run to Subway that leaves nobody happy.

The Valentines Food Passport takes a little bit of forethought to come up with all the restaurants to include, but once they’re collected, you need only consult the book the next time you’re hungry and idea-less. The cute colored sticker rating system (see the green sticker in the photo above) lets you score whether you liked the place so you can easily remember where to go back to. Plus, since all you really need is a pen and a mini-notebook, it’s the perfect quick and easy Valentine’s Day gift to make you look sweet and thoughtful, even if you actually forgot about impending the holiday till mere days before. Not that anyone would actually do that, right? 😉

Holiday Projects

This time of year is probably the height of craft project fever and though I might restrain myself from indulging every impulse for all things glittery, retro and bright through the rest of the year, that’s what the holidays are for, right? Here’s a quick round-up of my favorite of the holiday craft projects I’ve stumbled on so far this season.

Not actually a project (but a product to buy) this style stocking would be a pretty easy DIY

Love me some bottle brush trees, and those colors are swoon-worthy.

Kids love personalization, and I can see this being a fun gift for school-age kiddos.

Simple and cute, I like that this project looks actually achievable.